So I bought one of those fancy Synology NAS devices. Since i often to build quite complex environments it seemed as a nice thing to place my iSCSI shares on a central NAS station instead of hosting them on Windows, then I noticed that the device also had support to run MySQL natively, oh the joy. So I hit google to find out how to administer the MySQL Server and nope... deploy phpMyAdmin everything said. Now, there is nothing wrong with phpMyAdmin except that I don't like it for numerous reasons. It has one of those interfaces and a usability flow as you expect a russian tank from the early 20's would - and that my friends is none. To administer this MySQL Server the real (and easy) way let's hit the console. I'm on a Mac, if you are on "a Windows" download putty or similar tool to get access to SSH.
Enable SSH on the device
> Go to your disk station web interface and open the Control Panel, click in the terminal Icon

> When the terminal settings are loaded enable the SSH Service.
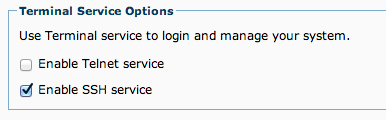
> Click Apply
Navigate to the device using SSH
I have called my device ds01 and it is located on my trikks.com domain
> write this to connect
ssh admin@ds01.trikks.com
I use my default admin user, enter the password and click enter. You may get a certificate warning, if so simply write yes and continue.
Administering MySQL
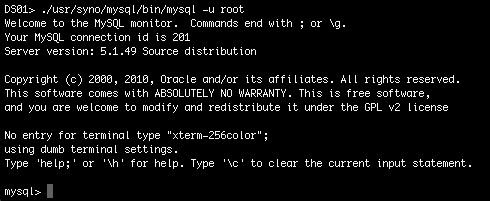
Since you are in the device you have passed the hard part. The rest is actually to play around a bit with the MySQL binaries that are located in the folder /usr/syno/mysql/bin/.
First connect to MySQL
./usr/syno/mysql/bin/mysql -u root
You should be welcomed with something like this
Set a root password
Even though it's not required, I really recommend you to set a mysql root password on the device. All users are stored in a database named "mysql"
mysql> USE mysql;
mysql> SELECT User, Host, Password FROM user;
+------+-----------+----------+
| User | Host      | Password |
+------+-----------+----------+
| root | localhost |          |
| root | DS01      |          |
| root | 127.0.0.1 |          |
|      | localhost |          |
|      | DS01      |          |
+------+-----------+----------+
As can be seen above I switched to the database mysql and printed all users available in the user table. In MySQL users are separated by host, this means you can have multiple root users with different passwords, all depending on which host they are connecting from. To set a password for all root users
mysql> UPDATE user SET password=PASSWORD("NEWPASSWORD") WHERE User='root';
mysql> FLUSH privileges;
Replace the phrase NEWPASSWORD with your desired password, to verify that it happened run the select SQL query again
mysql> SELECT User, Host, Password FROM user;
+------+-----------+-------------------------------------------+
| User | Host      | Password                                  |
+------+-----------+-------------------------------------------+
| root | localhost | *97D6E45C0D981055B8CF1BA88CE69338CDD3F45D |
| root | DS01      | *97D6E45C0D981055B8CF1BA88CE69338CDD3F45D |
| root | 127.0.0.1 | *97D6E45C0D981055B8CF1BA88CE69338CDD3F45D |
|      | localhost |                                           |
|      | DS01      |                                           |
+------+-----------+-------------------------------------------+
The root user password have been updated.
Adding a new external user
This is so very often required, you may either have a service outside the NAS that need access or simply a user for an administration program. Ensure that you are in the mysql database (use mysql;) and run the following command
mysql> GRANT ALL privileges ON *.* TO 'admin'@'192.168.1.%' IDENTIFIED BY 'password' WITH GRANT OPTION;
mysql> FLUSH privileges;
What this command does is to give the user 'admin' coming from the network 192.168.1.xxx full access.
And simple like that I can use my beloved interface Navicat again!
Backing up?
There are a lot of backup agents for MySQL, I'd recommend using something. But while we are at it here is how you do a backup from the ssh command line in the Synology world.
./usr/syno/mysql/bin/mysqldump --user root --password=xxxx --database my_blog > /volume1/BackupShare/my_blog.sql
Keep it simple!